Thursday, July 31, 2014

Special Delivery-Dining Room Table

If you have been following along, a few days ago I shared with you a major plumbing project that I had going on in June.
 
At the end of the post I told you that I was having something special delivered on Saturday.....well, here it is.
 
Ta-da!
 
My new (to me) dining room table!


I have been doing so much research looking through all the different styles of tables and was torn on whether or not to get a rectangular table like a farm house table, or a circular table like a pedestal table.
 
There are so many beautiful table styles out there that once I decided on a round pedestal table, I then had the hardest time deciding on whether or not I was going to paint or stain the table.
 
Before I spent any money on a table I wanted to make sure it was what I wanted, so after months of searching I finally found a table on Craig's List  and it was exactly what I had been looking for!


The diameter of the table is roughly 41-42 inches, which works perfectly in this space.
 
As for the quality of the table, since it is used, it has a beautiful crisp white pedestal that is in great shape.


I will need to do very little to the pedestal base,
but the top needs some work.


It has some spots that are worn but the overall condition of the table is solid.


I will be sanding off the finish on top to remove the light oak finish and smooth out all those scrapes and scuffs, then I plan on finishing the top, but I will stop there and leave the rest a surprise! :)


I love buying things off of Craig's List.

 
This makes my fifth purchase in the past eight years,
and I am happy to say my experiences have been pleasant, but this particular time I met a really neat young couple
who are just starting out and it was a pleasure buying from them.
 
 
They made the process go by so much easier because they were so personable and genuinely nice people, and for a little extra they delivered the table too.


I love my new (to me) dining room table and can't wait to get back to work on my dining room makeover!
 
I am super excited about all the ideas I have in store
(including updates made to the chairs you see in the picture)
and can't wait to show you the table
once it is completely done.
 
 
Wish me luck!!!! :)


Jennifer


Linking Up to These Great Parties:


Tuesday, July 29, 2014

New Fall Handbag and Scarf

I am the kind of girl who likes to change out my purse with each season.
 
I know many of you are the one hand bag type who have a basic black bag and carry it all year long, but for me, I like to change it up periodically and keep the look in sync with the seasons.
 
So now that it is late in July, my mind has started to think about my Fall clothing needs.
Well, clothing "WANTS" to be exact! LOL
 
And when I found this purse at my local GW I snatched it up.
 
The brown color is so pretty and will look good with my jeans and fall outfits.
 
 
Pin It 
 
It is not quite a camel color and not quite beige.
 Its a rich color, very clean and actually looks like it may have only been used a few times.
 
The leather is soft and feels like its quality leather too, which makes all the difference in the world when you carry a leather bag.
You don't want it to look like plastic, so even if it is not an expensive leather handbag, you still want to look for one where the leather is soft, moveable, and more of a matte sheen to it.
 
(Shiny/plastic-y fake leather looks cheap, so stay away from shiny material unless its cloth)


Here is the other side that shows the side pocket, and below you can see the pretty gold hardware and zipper detail on the sides.
 
The zipper detail does work and helps the bag to expand when the zippers are down, but mainly they are for looks.


The funny thing is, after shopping at the thrift store this day I ran by Walgreens to pick up some medicine for my dog, and when I walked in they had received some new Fall merchandise which included these new scarves.
 
 
When I saw the green camouflage scarf I couldn't resist!


I thought it would look good with the purse I just bought and a pair of jeans with brown boots-
 
 
.....something similar to the middle look in this picture below, except my pop of camouflage would be from the scarf :
 
Camouflage

Sunday, July 27, 2014

A Plumbing Project I can Fnally Put Behind Me!

Nothing like coming home from work and seeing a Bobcat in your driveway!
...and I'm not talking about a feline Bobcat either! (Mom!)
 
 
When I called my Mom to tell her the Bobcat was in my driveway she replied:
"You have a bobcat in your driveway???
OMG  You better go inside and call animal control."
 
I said no Mom, a Bobcat MACHINE! ..and then we cracked up laughing!!! :)
 
 
Pin It 


So if you have been paying close attention, over the last month I had two major home improvement projects scheduled.
 
Two major things that the rest of my DIY projects were
dependent on, and now I can happily say that they are both
DONE and OFF MY BACK! Yay!!!
 
For starters, towards the beginning of June I had my
trees trimmed.
 
This may not sound like much to you but for me this was a MAJOR undertaking that I hired out. 
 
The tree and bushes were so over grown that it was starting to cause major problems around my house.
 
Over grown trees trap moisture around your home, harvest mosquitos and other bugs, and block the sun from getting places that it needs to be in order to keep your flowers and grass growing properly, so it is very important to keep your trees maintained by having them trimmed from time to time.
 
So besides the trees, I had one more VERY expensive project that was scheduled for this Summer and that was to have my main sewer line dug up and replaced.


You see, about a year ago I noticed that my sump pump would kick on even when we had been away from the house for two days and no one was using any water.
 
At first I thought maybe it had rained or the ground was just wet and the sump pump was luckily doing its job, so I didn't give it much thought and forgot all about it.
 
Well, I also noticed the main line on the INSIDE of the house in the basement was starting to rust and it appeared that some sewage was lightly seeping out of the rusted spots so I called a plumber to come check it out.
(Not thinking anything of the sump pup ordeal)
 
When they opened up the line on the inside of the house they quickly discovered that the pipe on the outside of the house did not butt right up to the one that was sticking out from the inside, therefore that meant I had sinking pipes! YIKES!

Sinking pipes? What does that mean?
 
Well, that means my old house has clay pipes and over time the ground shifting and/or tree roots can cause the pipes to crack which then leads to water running out of the pipe and causing the surrounding soil to become moist and soft.
 
Over time, the moist ground gets fully saturated and can no longer support the weight of the pipe so the pipe then begins to sink.
 
Once the pipe starts to sink the vicious cycle continues until one pipe fully sinks below the other and which blocks the flow of water from pipe to pipe and your plumbing will back up.
 
So, now that we got all that out, it was clear to me that I had better fix this or it was going to manifest into a much larger issue.
 
So, over the course of the past year I noticed the problem worsened and my basement had a few spots where moisture was building so there was no more putting it off. The pipe(s) had to be fixed!
 
So I began getting estimates, picked my company, and set the date!

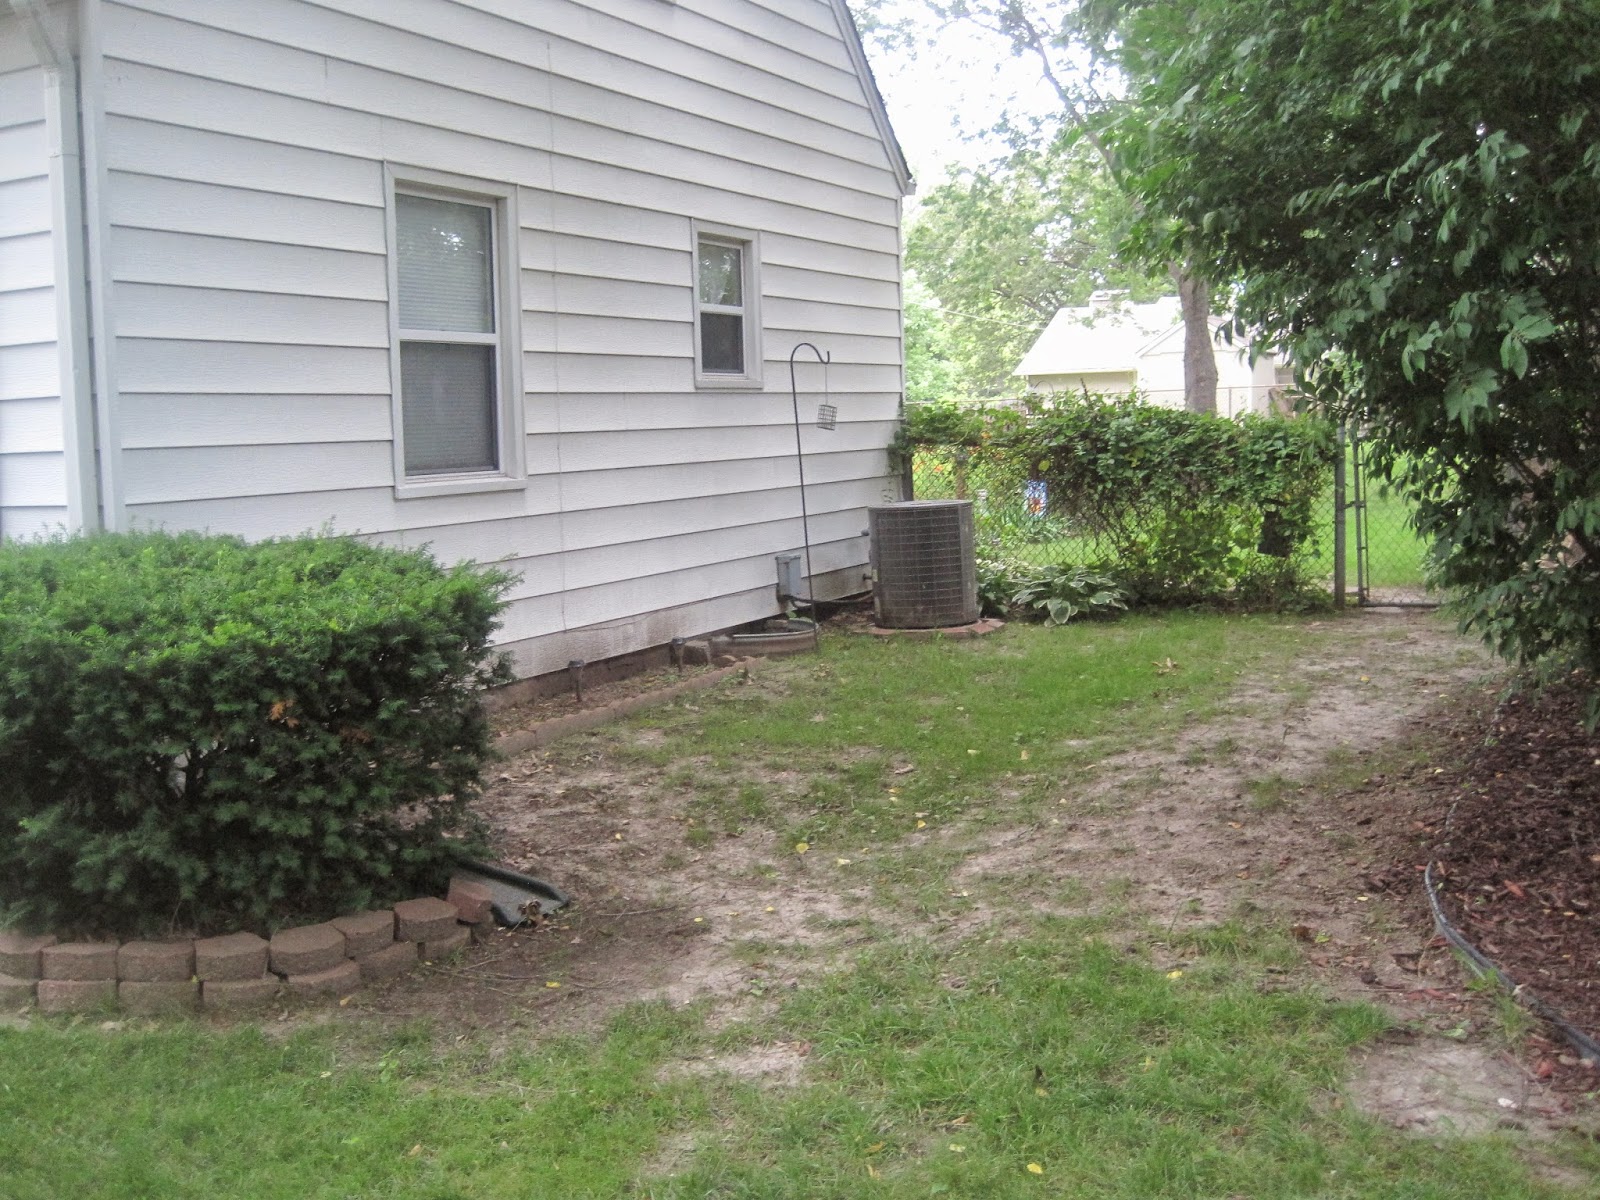
But before we start any work I want to show you a before shot of my yard where the plumbing is under ground.


Nasty, nasty side yard that once looked clean and pretty went neglected this Summer because I knew I was going to have this work done and the ground was going to be dug up.


Here is what it looked like a few years back after my neighbors trimmed their trees and I had more sunlight here!

 
My Hostas loved this spot!


I really don't like my yard looking like this so you KNOW after all this plumbing work is said and done my Fall to do list will include re landscaping this entire side of the house!

(just giving you a  heads up for future reference) LOL


Before we get started, you must make note of your utilities before you dig.
Of course, as my luck would have it, the plumbing is DIRECTLY under the spot where the air conditioner and gas lines are!
Of course!!!!!


But that didn't pose a problem at all.
 
Thankfully, when Dig Rite came to mark off the utilities, we discovered that the utility lines run AWAY From the water line, so we were totally fine and did not have any problems accessing the sewer line.


So they begin digging.

Once the plumbers dig deep enough to reach the pipes, the obviously saw the old pipe off and attach a new pipe.
 
Remember, I have an old house so I had clay pipes, and if you have never seen one you will be surprised like I was to learn that when they say "clay pipes" they literally mean CLAY pipes!


See! Clay pipes. I told you, but I bet you were like "yeah right, who has clay pipes"? :)


My pipes are clay therefore they were made with terracotta clay just like your terracotta clay flower pots!
 
 And you know how easily those things crack and chip,
so why on EARTH would anyone build a house with clay sewer pipes is beyond me, but I guess back in 1940
they didn't have plastics like we do today,
so that was the best material available at the time.
 
Ok, so once the plumbers removed the old pipe they replaced it with PVC, which should resist cracking/shifting/and tree roots, so it will more than likely never have to be touched again!
 
(future home owners, you can thank me now!!!!)
 
And, as far as how deep they have to go, its definitely not as far down as I thought it would be, hence why they always tell you to call Dig Rite whenever you need to dig in your yard!!!


So here is the pipe that extends from the inside of the house outward.
 
The plumbers will attach the new pipe to this.
 
 
They also ran a line down the pipe all the way to the main sewer line that the City owns,
and thankfully I have NO other areas that
needed to be fixed!
 
Sshheeeewwww!
 (keeps the cost MUCH lower to just replace this one small piece!)
 
So now that the new pipe is attached, the plumbers added an external access line so that now if I have to have any work done they can access the pipes from outside.
 
This is a major IMPROVEMENT since before they put this in anytime I had to have the pipes looked at they had to truck it inside my house and down to the furthest corner of my basement!


Once that was done now its time to back fill with dirt.


 And wouldn't you know it?!?!
My favorite part of owning an old home is when you start digging and opening up walls you discover something odd every time.  
 
 
This time we found some old tile flooring that for some reason was buried under ground with the pipe.
 
 
It was very heavy, backed with cement, and steel fibers that I think were there to help the tile adhere do the sub floor.
 
They definitely made things to last back then!


So there ya have it!
This was a large project and one that I HAD to address immediately, so I saved my pennies and got it done!
 
I would have loved to show you new flooring, a new bathroom makeover, or something exciting like that, but instead I am showing you plumbing.
 
Its not exciting but its definitely a part of DIY that most of us will have to tackle at some point in our lives!
 
Now that the trees are trimmed and the sewer pipe replaced, I can move on to better projects that are a lot more fun.
 
But don't worry....the wheels are in motion as we speak now that I have recovered from the plumbing project, so I am picking back up on my to-do list and actually making some good headway, 
in fact, I have a special delivery taking place this weekend that I can't wait to share with you in the next couple days!
So stay tuned!


Jennifer


Linking Up to These Great Parties:


Marvelous Monday Linky PartyThe Dedicated HouseIn and Out of the Kitchen Link Party - share and find recipes, crafts, DIY projects and moreYesterfoodA Stroll Thru Life 10308754_10203781373763465_7536899127074402936_n
 
Treasure Hunt Thursday


Thursday, July 17, 2014

I've Been Dreaming Again......About a New Bed!

Sheeww, what a busy week it has been! Sorry to have not posted in a while but this Summer is flying by and I'm trying to juggle multiple DIY projects, work of course, and all the fun Summer activities I love to do but I wanted to update you on something that has been on my mind lately.

I have been dreaming about a new bed!
 
Of course my inner thrifty chick DIY'er wants to make my own headboard, while the other side of my brain argues that there are WAY too many other projects I have in the fire and that I should just break down and buy myself a new bed.

For now, until the battle comes to an end, I just daydream about this bed from Birch Lane.


http://www.birchlane.com/Birch-Lane-Regis-Metal-Bed-BL3597.html
 Birch Lane Regis Metal Bed
Pin It

I know, gorgeous right? I love this bed for so many reasons.

  1. It comes in an Oil Rubbed Bronze finish that coordinates nicely with the colors of my bedroom
  2. It is versatile and will look good with any bedding that I chose.
  3. It is metal so it is easy to keep clean and will require very little, if any, dusting or upkeep.
  4. The design of the metal bars on the headboard and footboard provide an open and airy feel so that the bed does not hog up all the open space in my bedroom.
  5. And last but not least can you believe that JCP also sells a similar bed.....it actually looks like the exact same bed.
 And the price is a couple hundred less at JCP, so this would keep my inner Thrifty Chick happy if I could get the look for less too!

http://www.jcpenney.com/for-the-home/sale/view-all/jacob-metal-bed-or-headboard/prod.jump?ppId=1c41324&searchTerm=metal+bed&catId=SearchResults&colorizedImg=DP0123201417051351M.tif
 JCP Jacob Metal Bed
Pin It 
 
Here are some more beds that also caught my eye:
 
This bed is awesome because it has built in storage AND I can STILL slide stuff under the bed too for storage so it would add some much needed storage space to my bed room!
 
 
http://www.birchlane.com/Birch-Lane-Tilton-Panel-Bed-with-Storage-BL3931.html
Birch Lane Tilton Bed With Storage
 Pin It


And you all should know by now how I love Sea grass décor so of course I couldn't resist this bed!
 
(You can check out my DIY sea grass candle holders HERE).
 

Pin It 
 
I think it would coordinate nicely with the overall style of my home and you can purchase just the headboard too, so I wouldn't have to get the entire base
(which costs more and I'm not sure I really like
the base part anyway).
 
So as you can see, I have a huge decision to make sometime in the near future.
 
Until then I just sit and dream about each of them and how they would look in my room.
 
Of course if I were to make my own bed I would more than likely only make the headboard and I am thinking of following Anna White's instructions for making this one like Upcycle Addict made.
 
http://www.upcycleaddict.com/2014/07/i-built-my-son-bed-oh-yeah.html

 
Theirs turned out nicely and I'm thinking this would be a good weekend DIY for me.
 
I would make just the headboard only and I would stain it a dark brown/ORB color.
 
 
So there ya have it.
 
No decisions made at this time.
 
Just day dreaming and wishing upon stars at the moment.
 
I would love to hear your thoughts about my selections.
 
Are you particularly drawn towards any of them that I picked out?
 
 
Have a wonderful day!
 
Jennifer


Linking Up to these Great Parties:


Liz Marie Blog
 
<br><br><br><b>Join us every Friday...</b> JUNKINLOGO2211111The 36th Avenue
 
The Shabby Nest Say G'Day Saturday
Marvelous Monday Linky PartyIn and Out of the Kitchen Link PartyBlog Hop Blank 5 bannerBy Stephanie LynnBewitch Me & Titi Link PartyMonday Funday Link Party 10308754_10203781373763465_7536899127074402936_n