Pages

Saturday, September 28, 2013

How to Make a Fancy Bow


Pin It
A few weeks ago I had posted my Fall wreath and mentioned that I would show everyone how to make the pretty black & white hounds tooth bow that I attached to it.
So today I am going to walk you through the steps to making your own.

Pretty bows, fancy bows, whatever you call them, they look great almost anywhere you put them.
They can really dress up a Christmas or birthday present and even look great hanging from wreaths, banisters, on a staircase, and hanging on a fireplace, so if you are not already making these bows you should try making them by following these simple steps.


Start with a spool of your favorite wired ribbon, a twist tie, and scissors.
 
These bows are much easier to make and will look better if the ribbon is wired.


Cut about three feet of ribbon and loop around your fingers.

Tip:
Keep in mind the smaller and tighter the loops are around your fingers, the smaller your bow will be, so I like to wrap the ribbon around my fingers loosely so I get a "medium" size loop as shown here.


One you loop around your fingers, keep the remaining piece that does not fully loop around out like a tail and then pull out a little from other end so that you have a slight "tail" coming out of the top and bottom of your looped ribbon.
 
Tip: The longer the tail pieces are the longer your tail on your final bow will be.


Next just slide your twist tie under like I did above and then secure the twist tie around tightly so that your ribbon now looks like this:

Tip: If you are making a large bow and/or need to wrap your bow around something large you may want to use a pipe cleaner instead of a twist tie for this step.


See how the tails are sticking out?


Now for the fun part....just start fluffing and playing with the loops bending and shaping them to your desired look.


And to get the pointed look on the end just take one of the tails and fold it in half, then cut it at an angle. I already had cut mine, which you can see in the first picture but ideally, just wait until the end after you have formed your bow and then fold the ends and cut at an angle to give it the nice "V" point that everyone loves.


 Fold.
 
 
 Cut.

 
And you now have the perfect ending to your bow!
 
You are ready to secure it to your wreath, decor, wrapped gift....whatever....the possibilities are endless!


Here is one I made for my wreath........
 
 
and here is the one I made with you today........
 
 
Pin It 
 
Now you can impress your family and friends with your fancy bow making skills!
 
 
Jennifer
 
 
Linking Up To These Great Parties:
 
 Will Cook For Smiles
Pinworthy Projects Party Button TitiCrafty by CamilaThe Dedicated House
 
http://betweennapsontheporch.net/halloween-decorating-ideas-table-settings-and-movies/http://betweennapsontheporch.net/
House on the Way


My Uncommon Slice of Suburbia150x150 SSS Strut Your Stuff ButtonStoneGableFrom My Front Porch To YoursMonday Funday Link Party at thatswhatchesaid.netThe ScoopGlitter, Glue and PaintFour fab blogs one great partyLinky PartyHGTbtngreyFrench Country Cottagehttp://www.jenniferrizzo.com/2013/10/fabulously-creative-friday-linky-party-2.html

Monday, September 23, 2013

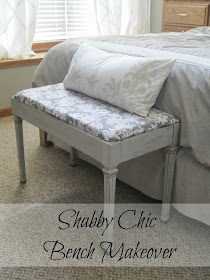
Shabby Chic Bench Makeover


It all started a while back when I was on the hunt for benches.
I knew I wanted one to put at the foot of our bed so when I found this bench that was the perfect size I had to get it.  
 
 
It sat for a while until we decided on a color pallet and repainted our master bedroom, which you can read about HERE.
 
Once we decided on the color pallet, I knew exactly how I wanted to redo the bench.
 
 
Because we have a lot of oak wood around the house (wood trim, hardwood floors, wood cabinets in the kitchen and bath, and a wooden headboard and shelves in our bedroom, and it goes on and on) I knew that another wood tone would be overkill, so I decide right away that I wanted this bench to be feminine, painted white or soft gray to tone down all the wood tones in the room, and to be distressed.
 
So Shabby Chic it is!
 
For starters I removed the fabric and changed it out with fabric I already had.
 
There were TWO layers of fabric already on the bench.......see?
 
Fabric number one:
Red and beige leaves........not really my style or color pallet.


Then there is fabric number two.............................
 
definately not my style and does no go with or gray and white color pallet in the bedroom, so it goes bye-bye!!!!


Well it went perfectly in our bedroom and I had just enough to reupholster the top of the bench. (score!)


To get the Shabby Chic look I was going for, I started by taking off the seat cushion and giving the entire piece a light sanding.  


Then I painted all the wood spots a dark gray color that I picked up for a steal because it was a mis-tint.
 
After that dried I went over the entire piece again with a light gray color by Behr called Gentle Rain.


One this coat of paint dried I then began to lightly sand the edges and corners, and then added a little more distressing to the sides as well.


See how the edges look worn?
 
Just run your sandpaper down the edge so that the wood grain peeks through.


I love Shabby Chic for many reasons, but one good reason is that it is a very forgiving style of decor.
 
Shabby Chic items are SUPPOSED to look worn and aged....not dated or "messed up". See the difference?
 
 
So here is the before and after:
 
 
I am almost ready to reveal all of the changes made to our master bedroom, but so far this bench and our bedding really bring a Shabby Chic look to the room by toning down and softening up all of the oak.
 
I am happy with how it is coming along and hope to reveal the entire room soon!
 
 
It has taken me a while to actually distress my furniture projects, but once I got over the initial scare it was fairly simple and added a lot of texture/dimension to my piece, and I really like how it turned out.
 
Pin It


So do you like Shabby Chic?

If so do you like your furniture to be distressed too?


Have a wonderful week!
 
Jennifer


Linking up to:


 My Uncommon Slice of SuburbiaHouse on the Way64170_4719850152887_625893102_nWhimsy Wed. BANNER


Domestically Speaking52 MantelsMade in a DayFrench Country CottageShabbilicious FridayFunky_Junk's_Party_Junk_link_party_150livelaughlinky 250x250The Shabby NestChic on a Shoestring DecoratingTitiCrafty by CamilaThe Dedicated Househttp://betweennapsontheporch.net/halloween-decorating-ideas-table-settings-and-movies/http://betweennapsontheporch.net/