Thursday, May 26, 2016

Rainy Days


Hello everyone! Just in case you did not know, it has been raining here in the Midwest ALL WEEK LONG!
For four days straight it has rained non stop, and I'm starting to go stir crazy! They are calling for rain through the holiday and into next week so I've got a while before its all over with.

Unfortunately, I can't work on any of my paint projects or do much DIY around the house while its raining so I have been Spring cleaning instead.


Do I sound like I'm whining? Well, I kind of am! LOL

On the bright side, the day before the rain started I was able to tackle two small projects related to my patio and I can't wait to show you once the rain subsides!

Until then I will continue my Spring cleaning and dreaming of the sunshine and the pools that will be opening soon.

How is the Spring weather in your neck of the woods? Getting much rain?

Jennifer


Monday, May 16, 2016

One Urn Many Different Looks


Every Spring I always look forward to getting creative with my black urn.
The urn is usually a focal point on my porch so I try to do something different with it each year.

Over the years there have been many different things I have planted...some survived and some didn't, but here are some of my favorite looks for my urn.


Pin It


This was back in 2013 and I went with darker purple tones using various styles of coleus mixed with a potato vine and purple fountain grass of some sort.

I really like how rich this mixture of color looks against a beige house.

I stayed away from "flowery" and went with more foliage and it turned out to be one of my favorite designs.


The following year I was back at the Cape Code house, which is a white house with green shutters, so I chose to plant something bolder with more color that would stand out against a white house.

The lime green an hot pink colors were perfect and they lasted all the way into fall!


I chose coleus for this again, but this time I only used coleus and I loved it!

Funny thing, coleus is supposed to be a partial shade plant but this area gets full sun. As you can see the coleus did't mind it and filled in nicely to create a very colorful focal point for my porch. .....this too is another one of my favorite styles.


Ok, so I love this urn so much that I bought another one for my side yard where I get more shade.

It is a really lush space, and until buying my house I never realized how much color you can get in a shaded area. You just have to know which plants work best for shade.


I filled this urn with pink double impatients. I'm sure almost everyone has heard of impatients, but these are double impatients which look like little baby cabbage roses.


The pop of pink against all the green from the honeysuckle on the fence and hostas is an unexpected splash of color.


I also recently updated this space with these copper lanterns. Don't be afraid of shady spaces...there is a lot you can do with them!

I loved how this turned out and think I will try it again this year!


Lastly, you may remember a few years ago I took a boring cheap dollar store urn and gave it a makeover.

It turned out to be one of my most popular posts.
You guys loved it and so did I!


Pin It


It is amazing what some paint and flowers can do for your patio. Just add a few urns (paint them or leave as they are) and randomly place them on your patio and fill with plants that give height, color, or spill over to add an unexpected elegance to your patio without breaking the bank.

So there you have it. My top favorite urn styles!

If you do not have an urn I hope you are inspired to get one and play around with different looks. You can find them everywhere....dollar stores, Lowes, Home Depot, and even your local nurseries.


Enjoy!


Jennifer


Linking Up to these Great Parties:

PrettyProjectPartyPhotobucketthe stonybrook houseBewitchin' Projects Block Party


http://www.athomewithjemma.com/2016/05/garden-party-2.html?showComment=1464026275230#c131138272395435402

Join Us for Share Your Cup


Tuesday, May 3, 2016

Adding Farmhouse Inspired Wall Decor


Pin It
If you have been following along with me you probably know that I have been working on updating my living room. I started back in January with a new paint color, then gave my mirror above my fireplace a makeover, and since then I have been shopping around for accessories.
I recently came across two decorative plates at the thrift store from Nell Hills.

I love when I find designer goods at the thrift store!


I was hoping I could find the third plate but I only found two coordinating plates.


I tried hanging up just the pair but something was missing so I incorporated a white IKEA plate in the middle to finish my set of three, and hung them with hangers similar to this one:


http://factorydirectcraft.com/catalog/products/2030_2039-15181-wire_collectible_plate_hanger.html?ccset=US&utm_source=bing&utm_medium=cpc&utm_campaign=(ROI)%20Shopping%20-%20Home%20Decor&utm_term=1101002953601&utm_content=Shopping%20-%20Home%20Decor


I used to have square plaques hanging up in this space and I knew I was going to replace them with something with a farmhouse flair, so when I painted the living room I left the nails in tact.


All I had to do was wash my plates, attach the hook and then hang them up.


Easy peasy and I LOVE how they look next to my fireplace!


This is an easy and budget friendly way to add a farmhouse touch to your décor, and you can't go wrong by picking up plates at the thrift store.


Pin It
There are a TON of plates to chose from and you can get really creative with this.

I found these designer plates for a couple bucks each and they retailed for $13 each so I saved quite a bit by hitting the thrift store before buying plates from a retailer.

I love the look my living room is taking on and can't wait until I can do a final reveal.


You can red about my mirror makeover HERE
And about the new wall color HERE
And get the details on my bamboo blinds HERE


I still have a few more accessories to paint and I'm waiting on the arrival of my new furniture so stay tuned...there will be more to see of my living room!

Jennifer


Linking Up To These Great Parties:


poular blogger thursday favorite things link partyThe-Creative-Exchange-Link-PartyH&GT BUTTON FALL


Grab button for Dishing it & Digging ItBewitchin' Projects Block Party


ftf hop headerMerry-Monday-Link-Party-300x300Be Inspired Link Party-Thursday

MMJ Link Party BadgePrettyProjectParty


Sunday, May 1, 2016

Upcycled Copper Lanterns

Spring is here and that means refreshing our outdoor spaces.
I don't know about you, but I do not like spending a lot of money out outdoor décor because I do not have a covered porch and the sun, wind, and rain tend to ruin everything.

As I was cleaning out my garage to go through all of my outdoor items I saw these two copper lanterns that I had shoved to the back of a shelf and forgotten all about.


I remember buying them at a thrift store and they were on dirt cheap Christmas clearance after the holidays. They were $1.98 each! I thought I would paint them or perhaps clean them up and use them in my Christmas décor and I never got around to working with them, so when I rediscovered them on the back of my shelf in the garage, I did the happy dance.


Now, these lanterns are not pretty as they are with that metal ribbon do-hickey attached to them so I decided to try to remove this piece without damaging the lanterns.


To my surprise the ugly metal ribbon do-hickey just popped right off! How many times does THAT happen? ....its NEVER that easy! LOL


See. I told you. Just popped right off with no damage to the lantern. Yay!


Now I have two copper lanterns that are in perfect shape that I plan on using in my yard.


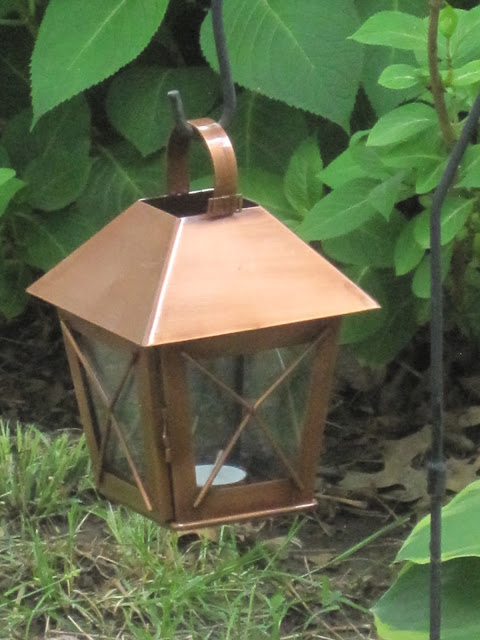
I have a lush area of my yard that is mostly shaded and I wanted to add walk way lights or some sort of yard art to jazz up the space and decided these copper lanterns were perfect for this space. 


I wiped them down, popped in a tea light,  and we were in business.


Now I can't wait until my Endless Summer Hydrangea behind the lantern blooms.


This was the easiest up-cycle I think I have ever done and you would never know they used to be Christmas décor!


Pin It


Here is the before and after:


So as you walk through the thrift store don't pass up the holiday section because you never know what you will find!


Jennifer


Linking Up to These Great Parties:
Merry-Monday-Link-Party-300x300Grab button for Dishing it & Digging ItYour Whims Wednesday