Sunday, August 24, 2014

Garden Gate Inspiration for My Side Yard

My side yard needs some help.
 
It currently contains a chain link fence covered in  honeysuckle, which I love, but this side of the yard has gone unused for so long because it is closed off and does not open up to the back yard.
 
Consequently it houses trash cans and is often times a dumping ground for all those random things that have no home, so it is definitely overdue for a makeover.
 
So after lots of day dreaming and research, I have come up with a sample of garden gates that caught my interest and I would LOVE to have any one of them in my yard!
 
(Click on each one to take you to the owning sites)
 
This gate is nice because the pickets are so close together that it provides total privacy yet is low enough to allow natural light in the space.
 
http://www.bhg.com/gardening/landscaping-projects/landscape-basics/do-it-yourself-landscaping/?socsrc=bhgpin050414doityourselflandscaping&crlt.pid=camp.6xwf08ULVtMt
 
 
This gate would look great with the rest of my yard and I am smitten over the natural stone pillars.
 
The mix of stone and white pickets with black hardware totally scream cottage garden which I love!


Pin It
 
Then there is this white picket fence with arched arbor.
 
You may remember that I  have a small white picket fence in my back yard that this area will open up to, so the white picket fence would tie in nicely with the existing one, but I'm not sure I want more white fence up against my white house.
 
My favorite aspect about this specific gate area is the flower box on top of the fence!
 
I would like something like that in my space that would allow me to get creative and I could even rotate the plants out every season if I wanted to.
 
garden-fence
 
 
Now this gate is a little different. It is by Confessions of a Serial DIYer and is taller than what I am looking for, but the scroll work in the middle opens it up and allows you to see through to the other side, and it also adds some interest to a plain wood gate.
 
I really like it and think it would give my space a nice focal point.


http://www.confessionsofaserialdiyer.com/how-a-girl-built-a-gate/
 
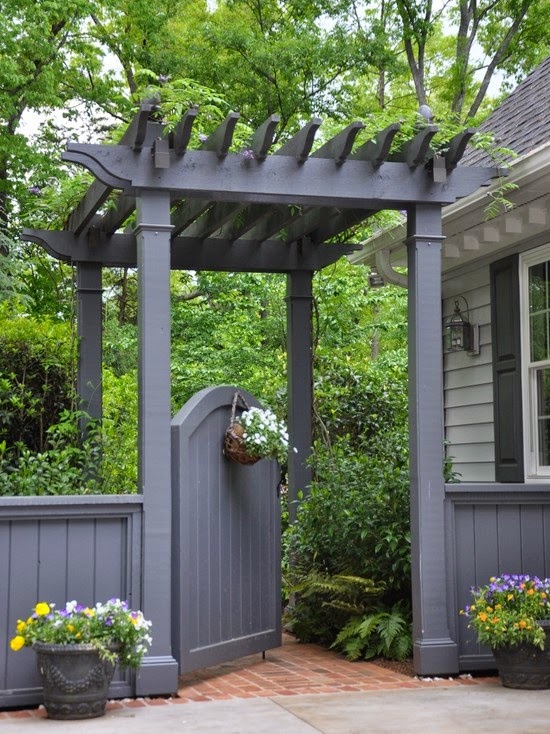
Then there is this gate with a gorgeous arbor.
 
I have wanted one of these for so long and love it for a couple different reasons.
 
For starters, the rounded gate wins me over every time, and you can't go wrong with the arbor above.
 
I also like that the arbor adds height to the space and since I have huge trees, I can always go for something a little more massive and taller.
 
.....and the gray color is so pretty!

http://www.houzz.com/photos/traditional/Automatic-Driveway-Gates-/p/200
 
Pin It 
 
 
This gate has a cottage feel to it too, and I love how the top part has lattice that allows light to filter through
.
The gate has an old vintage feel to it too and would look great with my house and surrounding landscaping.


http://www.midwestliving.com/garden/ideas/great-gates/page/7/0


And here is another gate but this time it has an arched arbor that holds a massive Clematis vine.
 
I like that this gate has swinging doors too. Its a little different but yet has a very natural feel and blends in with the landscaping that surrounds it.


http://threedogsinagarden.blogspot.com/2011/05/garden-in-between.html


 And finally this gate has a little bit of everything.
I love that it has an arbor and the curved shape of the gate is a little different and gives it character.
 
The wood tone is pretty and provides a nice contrast against all the landscaping, and of course the cottage feel of the black hardware is the cherry on top.
 
The only thing I do not like about this is that there is no space between the pickets on the fence and so far I have been leaning towards a fence where you can see between the pickets, BUT I can always have this gate with the fence the way I like it. I really do love this gate and so far it is my top choice.


http://www.mygardendiaries.com/2014/08/moving-moments_13.html


Here is the side of my yard that will be getting a makeover.
 
There will be a new gate, new lighting and landscaping, and the trash cans will get a new home too.
 
I haven't quite decided on whether or not I will DIY the gate or hire it out.....it will just depend on which gate design I wan to go with.


Pin It
 
So I am reaching out for your advice.
 
Which gate above do you like the best and why?
 
I would really appreciate some feedback to help me decide and I know you guys have great taste! :)


Jennifer


Linking Up to These Great Parties:
link-party-finalAdorned From AboveThe DIY'ers ButtonA Stroll Thru Life
Bewitching-Projects-LP-300px
Savvy Southern StyleThe Bajan TexanTreasure Hunt ThursdaySay G'Day Saturday @ Natasha in OzBe.You.Tiful Link Party ButtonDiana-RamblesDwellings-the Heart of You Home


Thursday, August 21, 2014

HomeRight Steam Machine Review

Lets face it. Life is hectic.
Well, I know mine is, hence why I named my blog Decorated Chaos.
 
It seems that no matter how much you plan or organize, life just seems to happen, and I always feel like there are never enough hours in the day to get everything done.
 
So when I had the opportunity to try the HomeRight Steam Machine I was super excited about it for several reasons.
 
The main reason is the versatility of this machine.
 
When you order your Steam Machine it will come nicely boxed like you see here.


And if you are like me, you will be amazed at how much they can fit into that tiny box!
 
The Steam Machine comes with so many different attachments that was like getting four or five different appliances in one!
Which again, helps you manage your hectic life by eliminating the need for multiple cleaning tools.


You see this?
Most DIY'ers know exactly what this is! It is a wallpaper steamer.

The HomeRight steam machine can help you remove all that old wallpaper you have wanted to tear down for so long.


Then there is the amazing steam gun.
 
 
By attaching the gun, the Steam Machine turns into a steam cleaner that you can use to clean your kitchens and bathrooms without using harsh chemicals, which means that it ALSO saves you money.
 
 
No more need to buy those harsh bathroom cleaners that burn your hands and nose every time you use them. You can simply clean your entire bathroom with this one machine full of water. That's it!
 
I only takes water and the power of the steam to  
break off the mold and mildew from around your shower and to sanitize it as well.


And after you clean your shower and sinks you will then simply attach the cleaning wand and cleaning pad to start steam cleaning your floors.


This little guy is so simple to use. You just unscrew that round black cap and fill it with water per the instructions using the measuring cup provided, and wait for the light to tell you when it is ready.


It is as simple as that!
 
I promise.


And check this out.

When you are done cleaning, all the special attachments fit nicely back inside!

That is right. It holds all of its own special cleaning tools, including a cleaning cloth, so you don't have to lug any of that around.


 It is all there waiting for you whenever you need it.

 
And it has wheels too so it can roll with you anywhere you need to go with ease.


I tried the Steam Machine in two areas of my home-

on the hard wood floors and in the bathroom.

Below is a short video clip of Mr.Chaos using the Steam Machine to clean our hard wood floors right by the front door where we get a ton of foot traffic.
 
 
See the steam coming out around the cleaning pad?
 
You can literally see it working and know that it is getting your surfaces deep cleaned and sanitized all at the same time without using any harsh chemicals.

 
As you can see, the steam loosened up all that dirt and lifted it away so that the floor was now truly clean, and sanitized.


And here we THOUGHT our floors were already clean, but sadly there was dirt still there deep down in the crevices of the wood where the mop can not reach.


I am absolutely in love with the Steam Machine and how much it can do:

  • It saves you money by eliminating the need for chemical cleaners.
  • It saves you time because you can easily use the Steam Machine then immediately head out to the grocery store without having to shower or change your clothes due to the messy cleaning chemicals you were using. All of that is eliminated.
  • It also can serve as a wall paper steamer
  • Fabric steamer to get wrinkles out
  • Floor cleaner
  • Bathroom cleaner-removes mold and mildew from the corners of tile and shower surround
  • Kitchen cleaner-lifts grease splatters and dried on food from counter tops and cabinets.
  • Clean your grill

The HomeRight Steam Machine is something that anyone can use. It is also light weight and easily stores away when not in use and carries all of its own special attachments too.
 
Because it only uses water and steam to clean, it is perfect for someone with sensitive skin or allergies as well.


So when life your hectic life just happens and drinks get spilled, food is left out and dried up on the kitchen counter, and your husband trucks in mud onto the floor, never fear, the Steam Machine is here!
 
This machine can do it all.
 
To get more information on the Steam Machine, or the rest of the HomeRight products, visit the HomeRight website HERE:
 
 
*I was provided the Steam Machine from HomeRight as mine to use and keep, but all comments and opinions are my own.


Jennifer


Linking Up to These Great Parties:
Liz Marie BlogSay G'Day SaturdayAdorned From Above{nifty button}Marvelous Monday Linky Party
 

Monday, August 18, 2014

How to Paint Drawer Pulls - Kitchen Update on a Budget

When I bought my house in 2006 I loved the size of the kitchen but HATED the outdated linoleum floor and kick myself in the butt for not having the buyer put in a new floor before I bought it, but you live and learn, right???


The house is older, about 70 or more years old, and has been renovated a few times throughout its lifetime. I think the last renovation of the kitchen was done in the late 80s or early 90s.....judging by the almond colored appliances and hunter green diamond patterned linoleum! (ugh!!!!)

So needless to say I have wanted to do a kitchen makeover ever since day one, but money doesn't grow on trees......well at least not in MY yard anyways! LOL

Luckily the cabinets have been painted in a soft cream color to blend in with the almond color appliances, and the counter tops and back splash are neutral as well, so I decided that I would have to live with it for a while but there were a few small things I could do to update the space until I was ready to do a full kitchen makeover.

The thing that stuck out the most to me besides the flooring was the cabinet hardware.
They were brass pulls with a white knob in the middle.

Painting Cabinet Knobs

However, I needed roughly 30+ knobs and after pricing new knobs it was going to cost quite a bit to replace all of them and I felt this was an unnecessary cost considering in another year or two I was going to renovate the kitchen anyway.

So I did what every thrifty chick would do and
I painted them!

It was the BEST. DECISION.EVER!
 
So let me walk you through the process.

Here is what I started with. Cream colored cabinets with all the pulls removed. 


And there they are. The boring brass drawer pulls that need to go.


Before painting, I scrubbed all the pulls in the sink with hot water and an scouring pad to remove any grime or grease build up, and to give the finish a light buffing.

I HIGHLY recommend doing this to prep your handles.


Then I sprayed the handles with a coat of this spray primer.


 I let them FULLY dry over night, then gave them two coats of my favorite go-to Oil Rubbed Bronze spray paint, and let them dry in between coats.


And voila! Instant update! 


Pin It
 
And now my drawer pulls coordinate with my oil rubbed bronze light fixture, and stands out against the cream color cabinets and yellow walls.


This project was SO easy to do that I was kicking myself for having waited so long!
 
It is labor intensive because you have to remove all the hardware, scrub each piece, then put them all back on once they are dry, so its not hard work, just tedious but so worth it! 
 
We also added a medallion above the oven, and quarter round to the base boards to finish off the floor, so  that helped update the kitchen as well, but these drawer pulls really brought everything together.
 
And now, even thought the kitchen still needs to be updated, it is more tolerable and not such an eye sore.
 
 
Now, for an update:
 
This project was done last Summer, (I know, bad blogger for taking so long post), but need to tell you that the drawer pulls have held up WONDERFULLY.
 I do not have ANY chips or rubbing off of the paint.
 
Absolutely NONE!
 
Before I tackled this project I was worried about the durability of the paint and because I was on a tight budget I was fearful of getting it started only to find out the paint would not look right so that is why I took extra time to prep the handles by cleaning and scuffing them up with the scouring pad AND for more assurance I used  a primer too, so I don't really know if these two things made a difference, but I know that they are holding up beautifully and even my friends and family were surprised at how nicely they turned out...................and I have a few friends who are wanting to paint theirs now after seeing how mine have held up.
 
So I am completely happy with how they turned out and would do it all over again!
 

 Pin It
 
As for my total kitchen makeover, well, that will start this winter, but for now it looks much better and will do until I decide on what I want to do with the flooring.
 
(There are SO many flooring choices that its hard
to chose one!)


Have a wonderful week!
 
 
Jennifer


Linking Up to These Great Parties:
 

Lil Mrs ToriYesterfoodThe DIY'ers ButtonAdorned From Above


Savvy Southern Stylehttp://www.thethriftyhome.comImparting GracePhotobucket{nifty button}Say G'Day SaturdayBe.You_.Tiful-Link-Party-Button-500x500JUNKINLOGO2211111Liz Marie BlogFlamingo ToesMarvelous Monday Linky PartyAdorned From Abovelink-party-finalTreasure Hunt ThursdayThe DIY'ers Buttonweekend retreat link party | www.akadesign.ca
Bewitching-Projects-LP-300px
Savvy Southern StyleWednesday Link Party