Monday, February 15, 2016

Adding a Shelf Above the Bead Board Wall

I hope you had a happy Valentines Day!

I had a great weekend and got a lot accomplished on my entryway wall and even got to play with my nail gun. Woot woot!

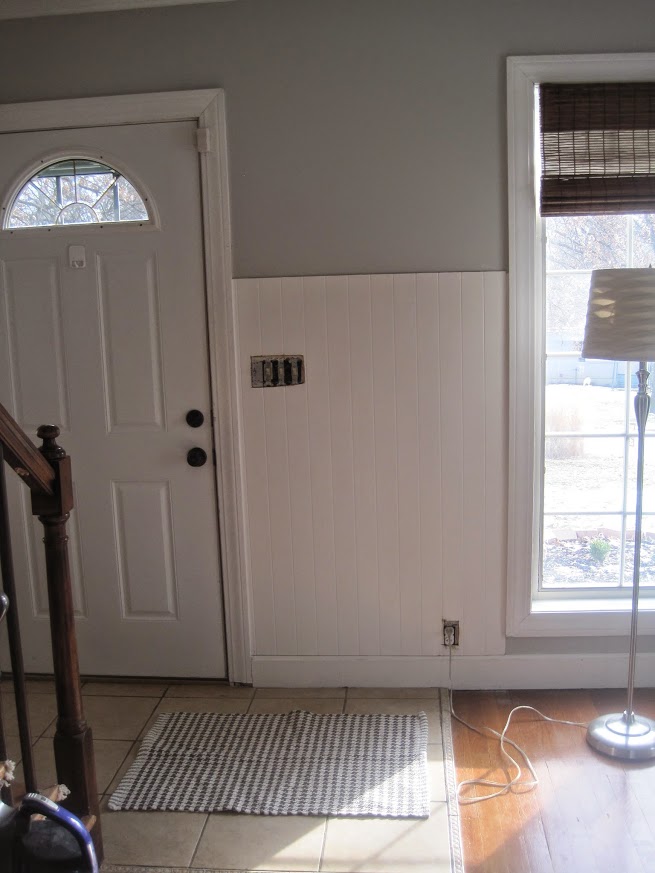
You may remember this is where we left off.

The wall painted and bead board cut and put up.


My goal is to create an entryway and I wanted the space to be functional.

It is a small space at the bottom of the staircase and next to the front door so I wanted to build a shelf/ledge, and install hooks.

Before I can put up either I needed to decide how wide I wanted the ledge.

I decided to make it wide enough for a picture ledge that can also hold a small candle and other décor, so I chose to use a 1x4.

I also decided on a wide header that would hold hooks so I chose a 1x6 for the header.

I knew my wall was 36 and 3/4 inches but ding dong me decided to have HD cut the board to 37 inches thinking I didn't want it to be too short.

and of course.....it did not fit!


Since it did not fit I have to cut a little off so I marked the boards with my cut line using a pencil and then used my hand saw to cut it.

Man, what a workout for your arms!  I really need to get a miter saw at some point.


So NOW my boards are the right length....sigh.....and its time to put this bad boy together!


I got the idea to create my ledge first by attaching the two pieces with glue and THEN using my nail gun to put it up in one piece.


I didn't have any clamps so I decided to use tape to hold the pieces together while they dried.


After finishing this project I would like to tell you to NOT do it this way! LOL

My board shifted and some four letter words were expelled from my mouth and I had to improvise, so if you decide to do it this way make SURE you secure the two pieces with clamps so they do not move on you.


Next, I held up my header on the wall and got it level before nailing with the nail gun.

You can do this by yourself like I did, but I suggest having someone hold it while you level and use the nail gun.


Just nail it once on each side so you can let go and free up your hands to finish nailing.


And here it is!

I love it!


So now with the ledge up it was time to spackle nail holes and caulk all the gaps.


I used this caulking specifically made for moldings:


And this is what it looks like after being caulked.


Pin It
Now that it is up I need to add a strip of molding under the ledge for interest and of course paint it, so there are a few more things to do and then I can give you a final living room reveal!


  • For tips on cutting bead board around wall sockets go HERE.
  • To see the new living room paint color go HERE.


Have a great week!


Jennifer


Linking Up to These Great Parties:

Thursday linky partyH&GT BUTTON FALLJoin Us for Share Your Cup


cc new banner party logoInspire me mondays link partyPhotobucketDIY Sunday Showcase Party buttonClever Chicks Blog Hop at The Chicken Chick®My Pinterventures

Monday, February 8, 2016

Easy Way to Create an Entryway and Tip for Cutting Bead Board

As you may remember, after Christmas I started my living room makeover.

I started by painting the room a new color and updating the accessories.

And for those of you who follow me on Twitter and Instagram have caught a glimpse of my final project in the living room but I will give everyone a hint...it involves creating an entryway space by the front door.

You see, here is the wall in question:


The space is tiled already and the tile kind of marks off what would be an entry way area so I have a good spot to start with, but in order to fully create a usable entryway I need to do something with the walls so I decided on doing a bead board wall treatment.

I purchased a style of bead board similar to this that had winder planks than the traditional bead board.

Unfortunately, I thought I also too a picture of the ACTUAL one I purchased and I must have forgotten, but this is very similar to the one I got.


My wall is 36 3/4, just a little more than 3ftt wide, so I bought one sheet and had the wonderful guys at HD cut a piece to my exact measurements.


Now, for all of you beginners out there, here is my tip for putting up your bead board.

Use a template.

Yup. That simple. A template....who knew?!

Here are my steps for using the template method:

How to cut bead board

Pin It

This is how I did it and it worked great for me so I am passing the tip on to  you with a step by step tutorial:

  • Before doing anything I measured the length and width of the space I wanted to cover with the bead board and had the guys at HD cut it to my exact measurements.
  • After that my bead board is the right size, I turned it over and rolled out a piece of wrapping paper to the same size as my bead board and then taped it to my wall.

  • What I have now is a piece of wrapping paper that meets the exact measurements of my bead board and my space, so all I have to do is take scissors and score/cut around the outlet and light holes.
    • To do this just simply use your  hands to feel around the space and score with your scissors accordingly, then cut your scored lines.
    • Once the template was ready with the holes cut out I took it off the wall, flipped my bead board over and taped it to the front of my bead board to secure it for my next step.
    • Next, just take a pencil and trace around where the outlet and light switch holes, then use your tools to cut them out.

    That's me tracing the holes for the light switches and wall socket onto the bead board.


    We used a Dremel to cut out the holes but you can use whatever cutting tool you chose.

    Once the holes are cut out its time to nail the bead board in place.

    Many people will tell you to use liquid nails on the back of your bead board so its completely secure to the wall with no warps, BUT my space is fairly small AND I want the flexibility of being able to remove it later down the road without tearing into my sheet rock. so I opted for simply nailing it with a nail gun and I did NOT use ANY adhesive on the back.


    I helped Mr.Chaos hold up the bead board while he nailed it in place then I took this picture while he was finishing up.

    And see the hole for the lights and plug in?


    Perfectly placed if I do say so myself! ....thanks to the template!
    With more practice I hope to rely more on my measurements instead of templates but this was a great way to go if you are a beginner.

    I love how this space is evolving and I can't wait to show you the completed project and a full living room reveal!


    Jennifer


    Linking Up to These Great Parties:
    the stonybrook house


    http://meeganmakes.com/inspiration-monday-party-46//#InspirationMondayYour Whims WednesdayFrom My Front Porch To Yours- Treasure Hunt ThursdayGrace at HomeFeatured On_Create Share Inspire Link Party_300_ROUNDEDMerry-Monday-Link-Party-300x300clip_image002Bewitchin' Projects Block Party