Wednesday, April 22, 2015

Fall Bulbs Turn to Spring Flowers

Remember when I planted bulbs last fall?
 
You can read about that HERE.
 
Well I am happy to show you their progress.
 
I planted a combination of purple hyacinths and yellow daffodils to add some Spring color to my porch.


Pin It 

The daffodils did not bloom together so I only had a few in bloom at a time, but the purple hyacinth did quite well. They bloomed large fragrant blooms, but they had a tendency to fall over when it rained.


So I am giving this spot another year to see if the flowers come back stronger next year.


Look at those gorgeous blooms!


I am glad I planted them in this spot right by the front door. They are so fragrant that their scent carries into the house every time you open the door.


Pin It
So the tulips, daffodils, and hyacinth have all bloomed and are now dying off as another round of flowers like iris and azaleas will be blooming soon!
 
 
For more gardening/landscaping tips, you can read about planting Fall bulbs HERE, and click HERE to find out  how to get more blooms from your flowering bushes.


Enjoy your day!
 
 
Jennifer


Linking Up to These Great Parties:


Sunday, April 19, 2015

New Light Fixture in the Mudroom


Now that the removal of the popcorn ceiling is done, its time to finish the touch up paint on the walls and put up a new light fixture.
  
 
It was now time to finally get rid of the typical "boob" light and upgrade to something more my style that would also provide more light.


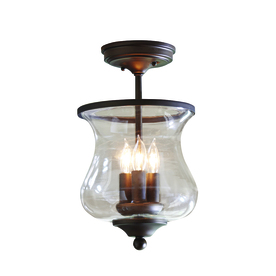
I knew I wanted to keep the Oil Rubbed Bronze finish and that I wanted a fixture that provided more light than what I had before, so when I found this light at Lowe's I knew I had to have it!


 allen + roth 8.68-in W Bronze Clear Glass Semi-Flush Mount Light


I love how the three bulbs light up the room and how the ORB finish looks against the color of the walls.


The glass globe is also pretty and allows for all the light to shine through unlike the light I had before. 

That frosted finish on my old boob light was hard to keep clean and it filtered the light too so I always felt like that room was too dark.


Pin It


When we went to hang it up we discovered that the hole in the ceiling was bigger than the mounting piece on the light so we had to work around it by adding a ceiling medallion.
 
I love this one because it has a beaded edging and is pretty simple so it does not compete with the look of the light fixture.


Pin It


Pin It


I have been searching online and the retail stores for a while now for that one fixture that I knew was the one. I started to get bummed out but then I discovered this light and knew it was the one!


Now that the ceilings are done and the light is up, I'm so relieved to be done with the hardest parts of this makeover. All I have left to do  now is get organized and decorate....you know, all the FUN stuff! :)
 
 
Have a great week!
 
 
Jennifer


Linking Up to These Great Parties:

Flaunt it Friday
 
Marvelous Monday Linky PartyA Peek Into My Paradisedotelltuesdayheader1PI 8pmThe Bajan TexanMonday Funday Link PartyThe Dedicated HouseYesterfoodDwellings-the Heart of You HomeWeekly Blog Link Up Party- Treasure Hunt Thursday- From My Front Porch To YoursYour Turn to Shine Link Party....Thursdays at 6AM EST | Hosted by anderson + grant, Bless'er House, Canary Street Craft, Joy in Our Home, and Meet the B'sThe Shabby Nest

Wednesday, April 15, 2015

Mudroom Reveal-No More Popcorn Ceiling


Pin It


Drum roll please....................its finally here. The big reveal I have been speaking of for over a month now!
 
Just in case you forgot, I will catch you up on what I have been working on.
 
It all started in January and it got derailed in February when I had a birthday, got sick, then got better but then had to have an outpatient surgery in March.
 
So you take all of that and mix in some bad weather and what you get is a delayed project, but I am pleased to reveal my pretty new ceilings.
 
Here is what we started with.....


Look at all those bumpy pieces of popcorn ceiling....soaking up all the light in the room and looking very outdated.


I started scraping with this section above and immediately got all giddy with excitement when I saw how nicely it was coming off!
 
So I scraped, and I scraped, and I scraped......


and the tarps fell, but that didn't stop me. No sir-ee.
 
So after all the mess (which you can see HERE), I finally have a smooth, white, clean ceiling


The light just bounces off the ceiling and it looks so clean and fresh.


I am happy to report only one rough spot and that was in the corner that pumps up to the back of the fireplace chimney where the roof leaked,
 
but no worries.
 
Just scrape, spackle, prime and paint and its all new again!


Here is that nasty corner after it was repaired and painted.


I had to get a close up for you of just the ceiling so you can see the difference.


I cant believe how much better the room looks now!


Here is the
Before and After:


Pin It
 
If you follow me on Youtube you got to see my quick and easy video tutorial on how to scrape your popcorn ceiling.
 
Here is my video. If you were like me and scared to tackle this project you can see in my video just how simple this project is.
It is easy, but MESSY.


Later this week I will share more finishing touches to the room like my new light fixture.


Have a great week!


Jennifer


Linking up to These Great Parties:
 
Marvelous Monday Linky PartyThe Dedicated House