
Hello everyone! Its day one of 2013 and I have a project to share with you. Its one of the projects I have had on my to-do list for a while now and it involves image transfers. I absolutely fell in love with this image from the Graphics Fairy last year and thought this would be a perfect project to start off the new year. (Its so Frenchy and shabby chic!)
On a side note, if you have not visited the Graphics Fairy blog you need to! Her website is stuffed full of awesome images free for your creative use. How awesome is that?!
She had this French bee image posted out there for a while now and I saved it hoping to use it somewhere later down the road. Well that time has come and I decided I wanted to transfer the image onto a piece of material and hang it in our office.
So first things first-I had to find a frame and buy fabric. Easy peasy, right?
I ran to the Goodwill and wouldn't you know it! They usually have a TON of pictures/picture frames to chose from but the very day that I go specifically LOOKING for a frame, there was nothing!After making several trips over the course of two weeks I finally found one I liked for about $2 bucks. This one is square and has some small detailing around the inner edges which I liked.
Quick tip when picking out picture frames....keep in mind of the frame and NOT the picture inside of the frame! Many people see a picture they don't like inside the frame and forget that they are not picking out the picture, they are picking out the FRAME! The picture will be discarded or covered up so don't get worked up over an ugly picture...look beyond it and focus on the frame itself.
This frame was the perfect shape and had good details but it was the wrong color, which was no biggie. I took it home and spray painted it black.
.JPG)
So now that I found my frame, the next step was to buy fabric.
Since I knew I wanted a natural woven look I decided to buy a drop cloth from HD. The color was perfect and they are made of very thick fabric which I really like too.
See the natural look in the fabric? Its not perfect and has some slight specs of color throughout which add just a bit of texture.

The next step, which was the hardest step, was to chose which image transfer method I was going to use.
After doing my research I decided I would start easy by using iron on transfer paper.
So to Wally world I went and I came home with this.
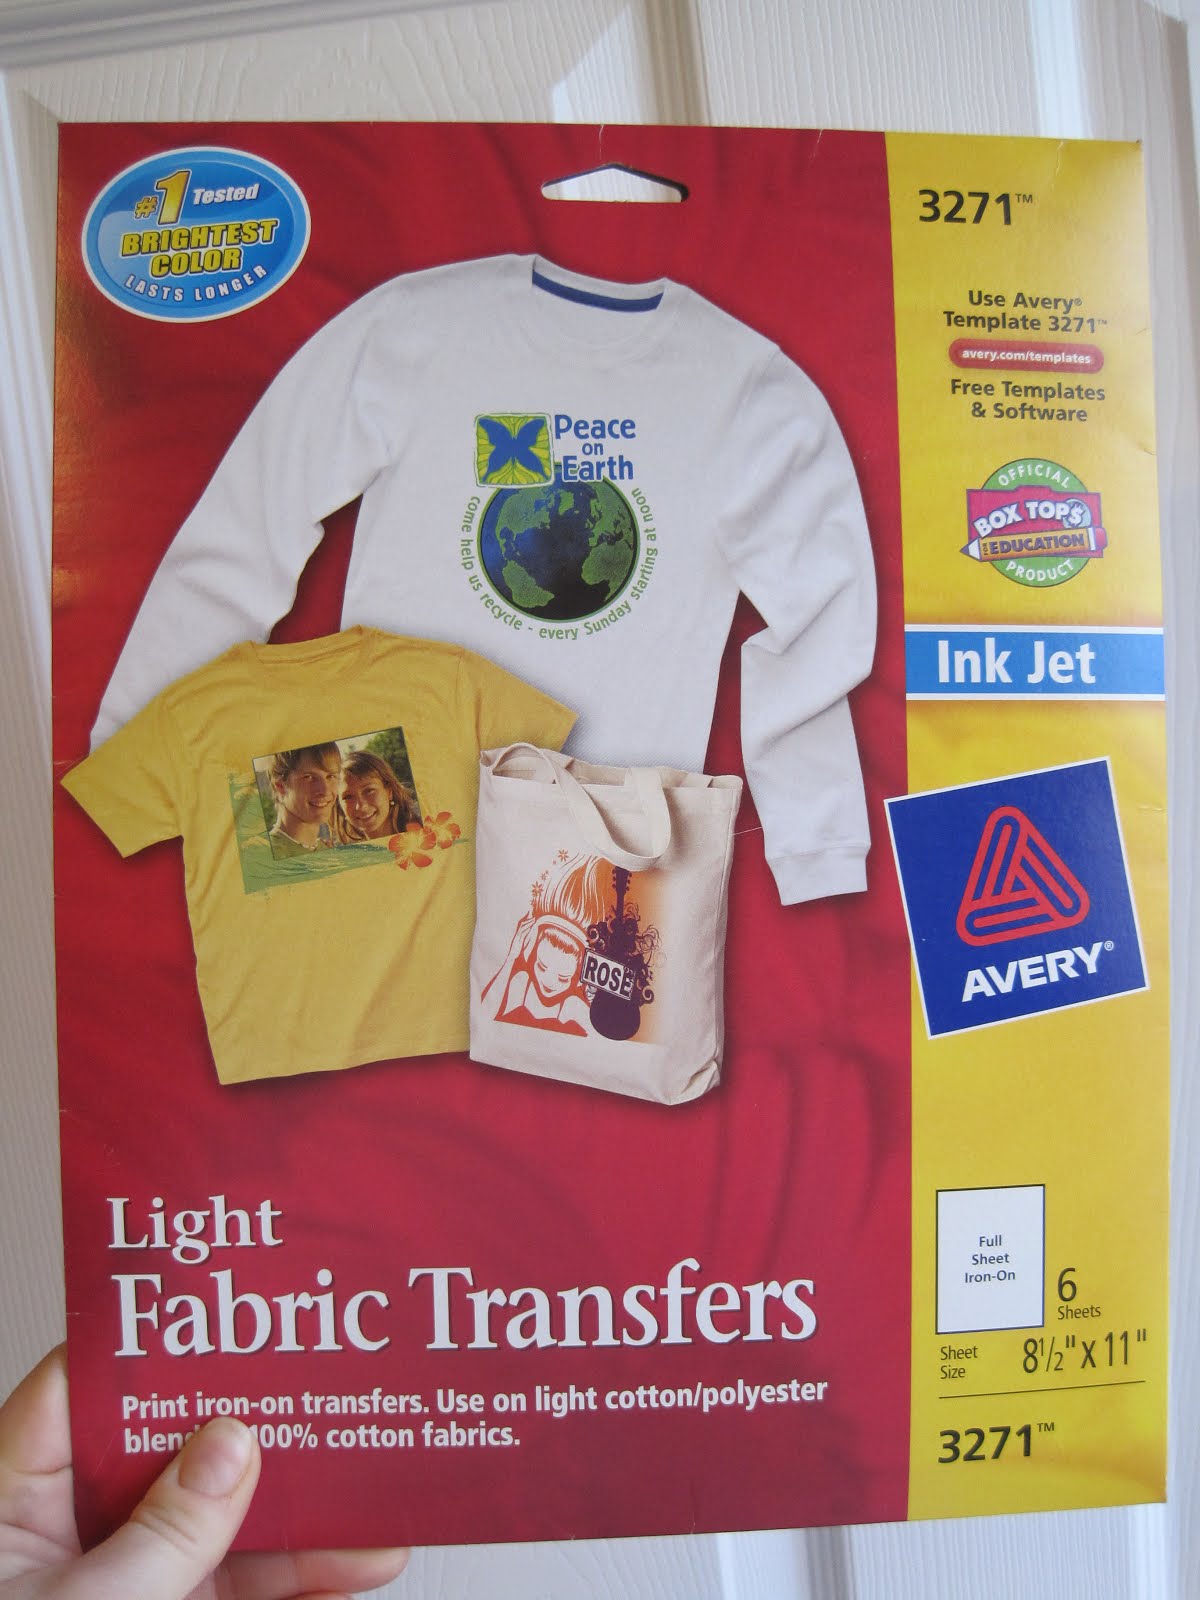
It was fairly inexpensive and was made specifically for light colored fabric so I thought it would make for an easy application.
I followed the directions on the box and basically all you do is print your image on the transfer paper using your printer, then iron it on and peel the backing off like a sticker.
.JPG)
Easy peasy and the results are fab!
I cut the material to size, transferred the image with transfer paper, then hung it on the wall using Velcro strips.
To add some interest I added a burlap bow that I attached to a 3m stick-on hook and ran the tails of the bow behind the frame so it LOOKS like the frame is hanging by the bow, but it is not.

Clear 3m hooks....I LOVE these guys!

And here is the finished product. I LOVE how this turned out and now I have a gazillion ideas for things I want to make using various image transfer methods!
.JPG)
And what a transformation.....you can't even recognize that this is the same frame and picture as before! Bye-bye 1990s picture and hello shabby chic!

If you are trying to plan indoor crafting projects, I highly recommend this. It was a fun and easy indoor project to do on a cold and snowy January day and now I have a piece of art work for my home office for about $6-7 bucks.
I have some more image transfer projects in store and can't wait to share them with you later this month.
Have a wonderful week and Happy New Year!
Jennifer
Linking Up to These Great Parties:


This is so cool - My Mother in Law loves french bees, so will have to find that graphic and give it a go. Great idea about getting 2nd hand frames too!
ReplyDeleteYour new picture looks so beautiful!! Great job!
ReplyDeleteLove this and on top of it all, the bee is my total favorite! Thanks for stopping by my blog & for the kind words....glad you found me, because now I know about you too! Looking forward to following! Jane
ReplyDeleteWow! What an amazing transformation! Love it!
ReplyDeleteSo cute . . . I love this! I have had some transfer paper sitting here for over a month now. Hearing how easy it was for you motivates me to move forward with my project. Thanks for sharing. Patti
ReplyDeleteThat looks great, Jennifer! I love that image and have that saved as well. I have so many of Karen's great images saved to my laptop. Visiting from Treasure Hunt Thursday. : )
ReplyDeleteThis turned out so cute!! Great job.
ReplyDeleteSusan
totally inspiring! I love how you did this, how inexpensive it was and how great it looks!
ReplyDeleteHi Jennifer...this is a great makeover!
ReplyDeleteCan't wait to try some myself!!
That looks fantastic and you sure make it look easy. :)
ReplyDeleteHow smart and clever are you. Great repurpose:)
ReplyDeleteJennifer,
ReplyDeleteThis came out so cute. I love it. I just pinned it. Thanks so much for sharing at Wednesday's Adorned From Above Blog Hop.
Debi and Charly @ Adorned From Above
Melanie @ Keep It Simple and Fun
Very nice! I haven't thought of fabric transfer to apply! Now I now.
ReplyDeleteKim